Basic knowledge

Go to CHATISFY website and hit any “Get Started” button, you are able to connect a bot through 3 simple steps:


(1) Create a new bot

(2) Select currency and time zone

(3) Connect to a Facebook page or Line account in Bot Settings.


※Note: Only the 「administrator」 of Facebook page / developer of Line Developers can connect the page. You can invite more BOT administrators through invitation link later.  

1 account can create multiple bots, however 1 bot is limited to connect only 1 Facebook page/LINE account. Bot is now available to connect both Facebook page & LINE account and synchronize statistics at the same time by upgrading to Combo Pack Plan.


During free trial, you have full access to all the features of Combo Pack for a period of 30 days from the moment that you first log in to CHATISFY dashboard.

Currently Facebook does not allow access to connect a Facebook group to chatbot.

1. Do not broadcast too frequently. In addition to following Facebook policy, CHATISFY suggests only send up to 1 message in a day。 Avoid sending messages just because you feel like doing so, or sending useless information to subscribers! You would not want your inbox filled with mass promotion, would you?


2. Broadcast is more than “one-way communication”, try to make it an ”interactive” conversation by using “button” to connect blocks. Give users options to interact with your bot through replying message or clicking buttons. This helps increase retention and create better brand impression, too!

Account permission is blocked due to two common reasons:
1. Using “+1” as keyword to trigger auto reply.
2. Inserting URL in Auto Message.


|Solutions|
1. Invite another Facebook account to be bot administrator.
2. Have the new administrator login and refresh page permission

If you wish to change the ”owner” of bot, please refer to the following steps:

1. Go to Settings > Bot settings > Invite new admin, invite the new owner as an admin.
2. Make sure the new owner has become a bot admin successfully.
3. Make sure the new owner has become the “Facebook page administrator”.
4. Contact CHATISFY Customer service, state the purpose to transfer, provide Facebook page name and the new owner’s name.

Hit this link, find the bot you wish to disconnect, then go to Settings > Bot settings, hit “Disconnect”, that’s it!


※Note: If you disconnect and connect the same Facebook page to another bot, all subscriber data will be reset and return to zero.

Simply hit this link to login!
※Note: You will not be able to login if you do not have a CHATISFY bot, please hit the green button below ”Get started free”!

Basic features and settings

Button:Up to 3 Buttons allowed (according to Facebook terms). You can link to auto-reply blocks, or insert URL and CHATISFY built-in form. Buttons stays permanently in the chatbox.


Quick Reply:Up to 10 Quick Reply buttons allowed. Once a Quick Reply is clicked, all options will disappear. It can only link auto-reply blocks, no external URL allowed.

Text and emoji are allowed in a text card. To make your bot more friendly, you can insert images into conversations.

There are two approaches :
Picture card : single picture at a time.
Gallery : combine picture, text, buttons, url in one card. (There are aspect ratio limitation : Messenger is 1.91:1, LINE is 1.51:1).
Gallery allows up to 10 pictures in a card. User can “swipe right” to see more pictures. If you want to put more than two sets of text + picture in one block, gallery is definitely recommended for its better user experience.
Text message in gallery is suggested to be within 50 characters to create a smooth reading experience.

Facebook : Maximum file size is 20MB for video, audio and file.

LINE : File is not accepted on LINE. Video & audio are limited to 10MB / 1 minute.

CHATISFY built-in forms allow you to collect user information and opinions more efficiently. You can know your audience better to design more personalized broadcasts & marketing strategy. Invite users to fill out form in the chatbox without redirecting to any websites, increase completion rate!

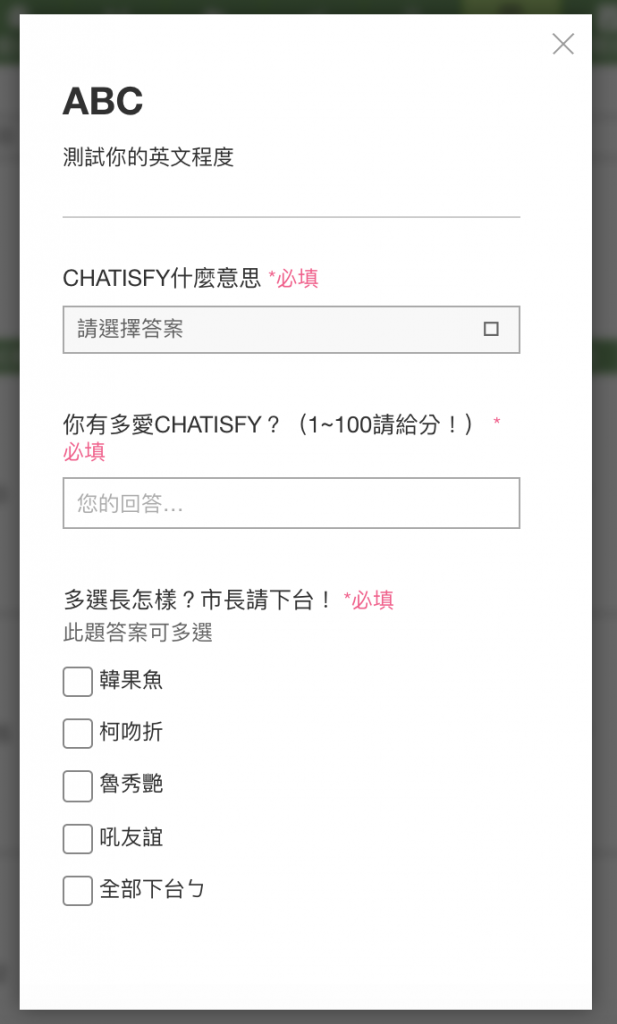
※Note : Form is not available for Free Plan. (All features are available during Free Trial)

You can think of sequence as an automated email marketing funnel. For instance, if you sell beauty product, you can set up a sequence of “mascara” related tips & tutorial. When a customer asks for “mascara” products in the conversation, your chatbot will automatically send out these messages to her in the next 1, 3 or 6 days. Constantly contact her to increase brand awareness, and you are more likely to turn a potential customer into a real customer.


However, keep in mind that Facebook has announced “24-hour messaging policy” which will take effect in Q1 2020. Sequence will be limited when it officially takes place.


※Note : Sequence is not available for Free Plan. (All features are available during Free Trial)

Main menu can be found at the bottom-left in a Messenger inbox.

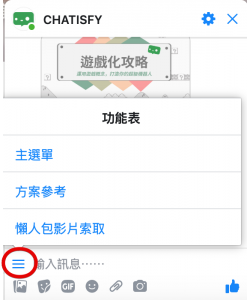
This is recommended especially for Facebook pages. Put the most frequently clicked buttons or basic informations here to help customers find what they need, and ease the burden of live agents at the same time.

Set up working hours to inform users that it is after-hours and customer service agents will get back to them during business hours.
Therefore, CHATISFY suggests you setting an auto-reply block as ”After-hours default reply”. This way users will understand they couldn’t get instant response due to after-hours and customer service agents are currently offline. This feature avoid long waiting time and negative impression of “poor customer service”.

When a user asks for live agent service, the bot automation will pause in order to avoid bot overlapping with live agent and confusing customers.
You can set up a reboot time after which the bot restart to reply in “Settings” > “Bot Settings” > ”Reboot BOT Automation”. If you have a heavy workload for 1-on-1 online customer service, we would suggest 20 minutes.

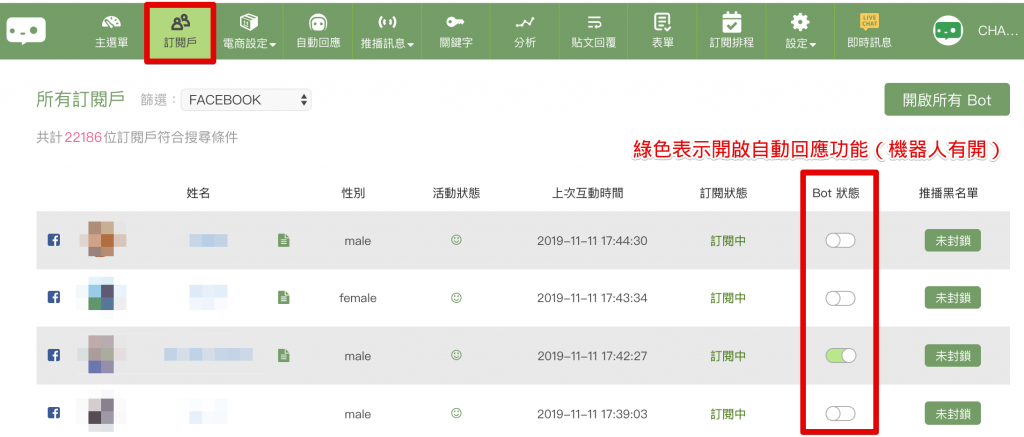
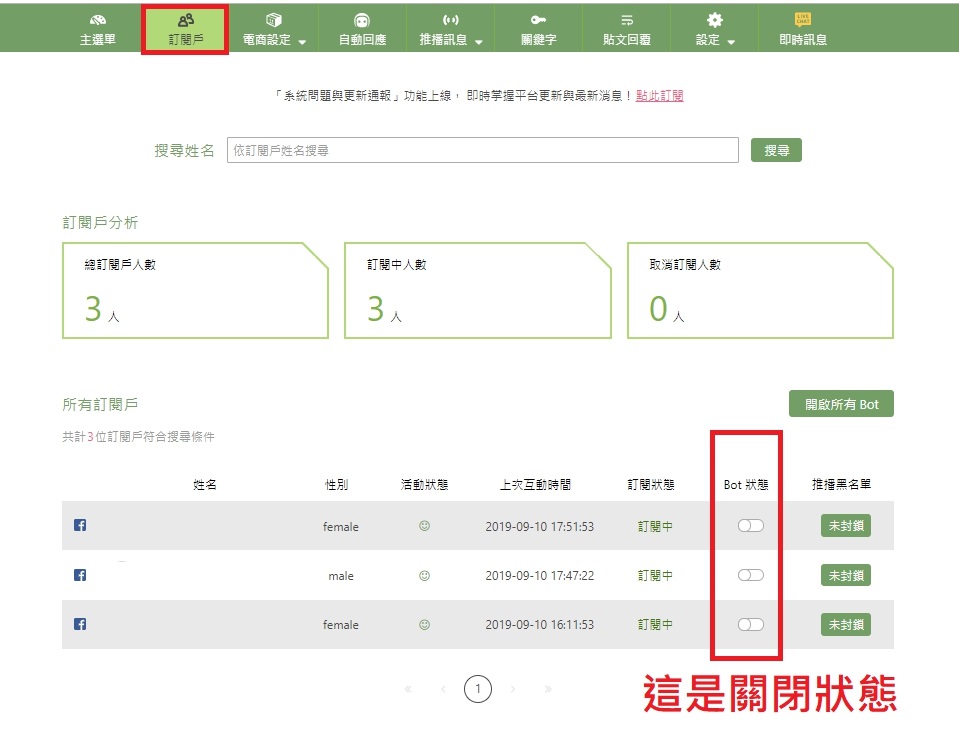
If you wish to reboot Bot status immediately after the conversation, go to “Subscribers”, find the user and turn BOT status switch on (green).

“Preset Messages” in Auto-reply

Each “block” on the left column stands for one conversation session. One block can be consisted of several messages, or ”cards”. Click on the block to see the cards in it.

There are several preset messages in each bot that are triggered by certain scenario, including : Welcome message, Default message, Customer Service, Turn off and Turn on broadcast. You can edit the messages as you like.

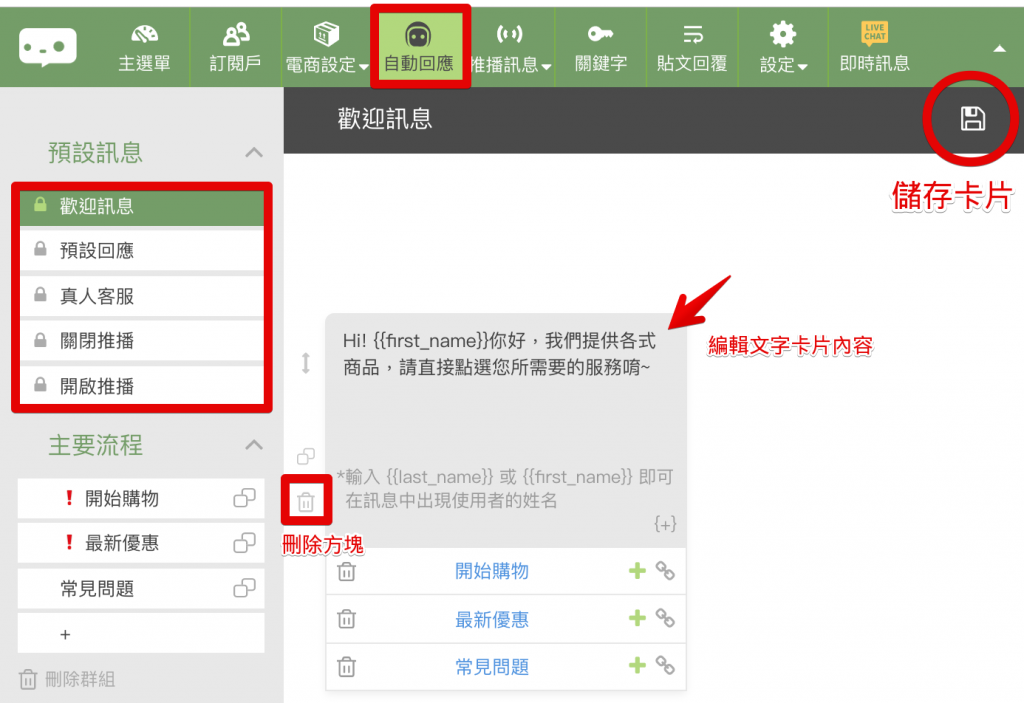
Click on the card, edit the content and hit “save” icon at the upper-right corner.

※Note : If you don’t want bot to send out preset messages, simply delete all the cards in the blocks you don’t need.

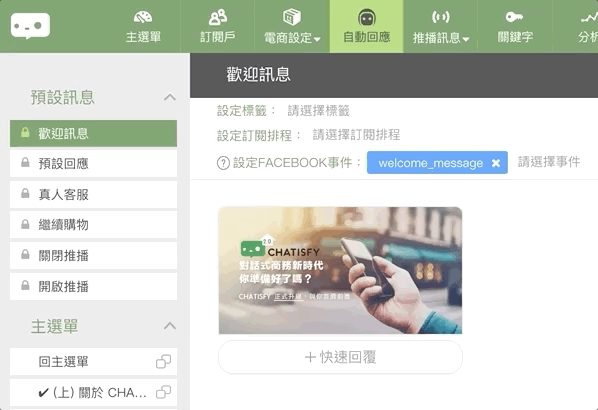
Welcome message is the first message users get when they first visit your Facebook page inbox and click “Get started”.

Default message is sent when the bot doesn’t know what to reply (e.g. no keyword matches). Tell your users what they can ask about (what keywords you set up) or provide them a menu by sending a message with buttons. You can also attach ‘FAQs’ to a button and lead them to find answers to generic questions, this would help reduce customer service agents’ workload, too!

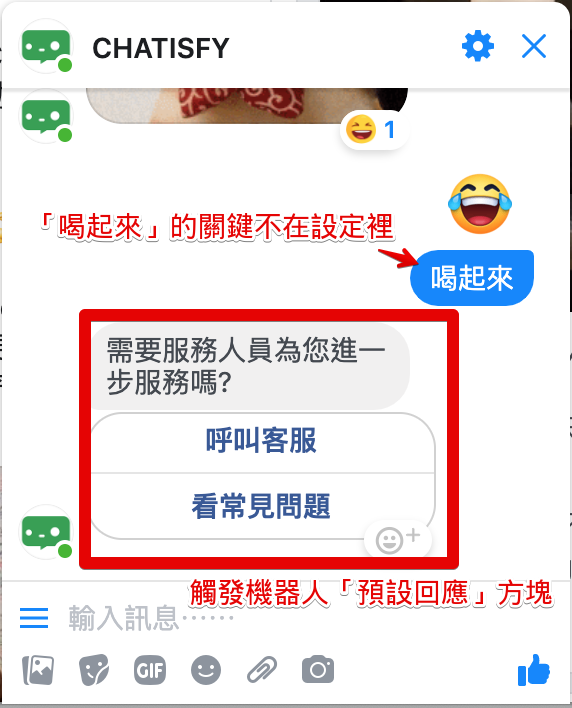
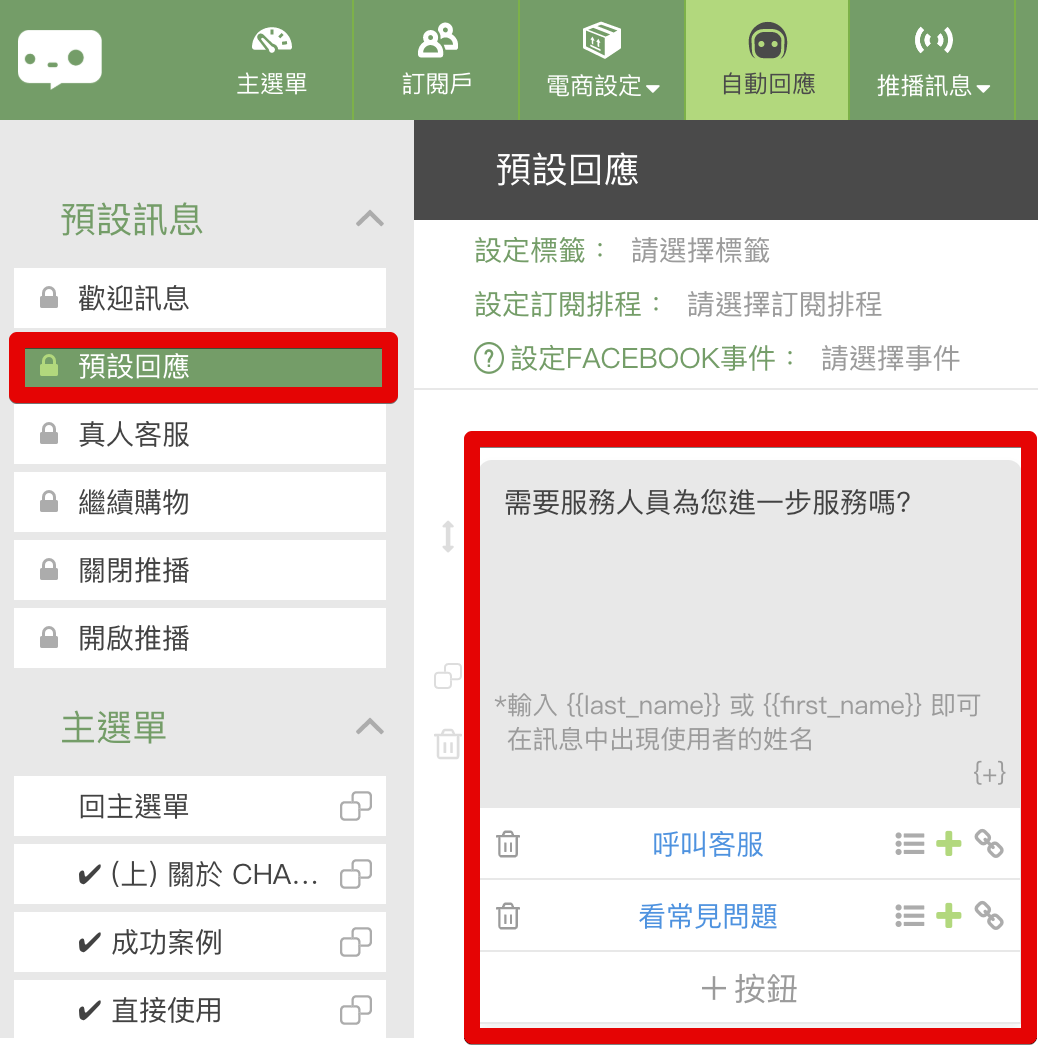
※Note : When default message is sent, bot automatically pauses replying. Default message can only be triggered once unless the bot reboots.

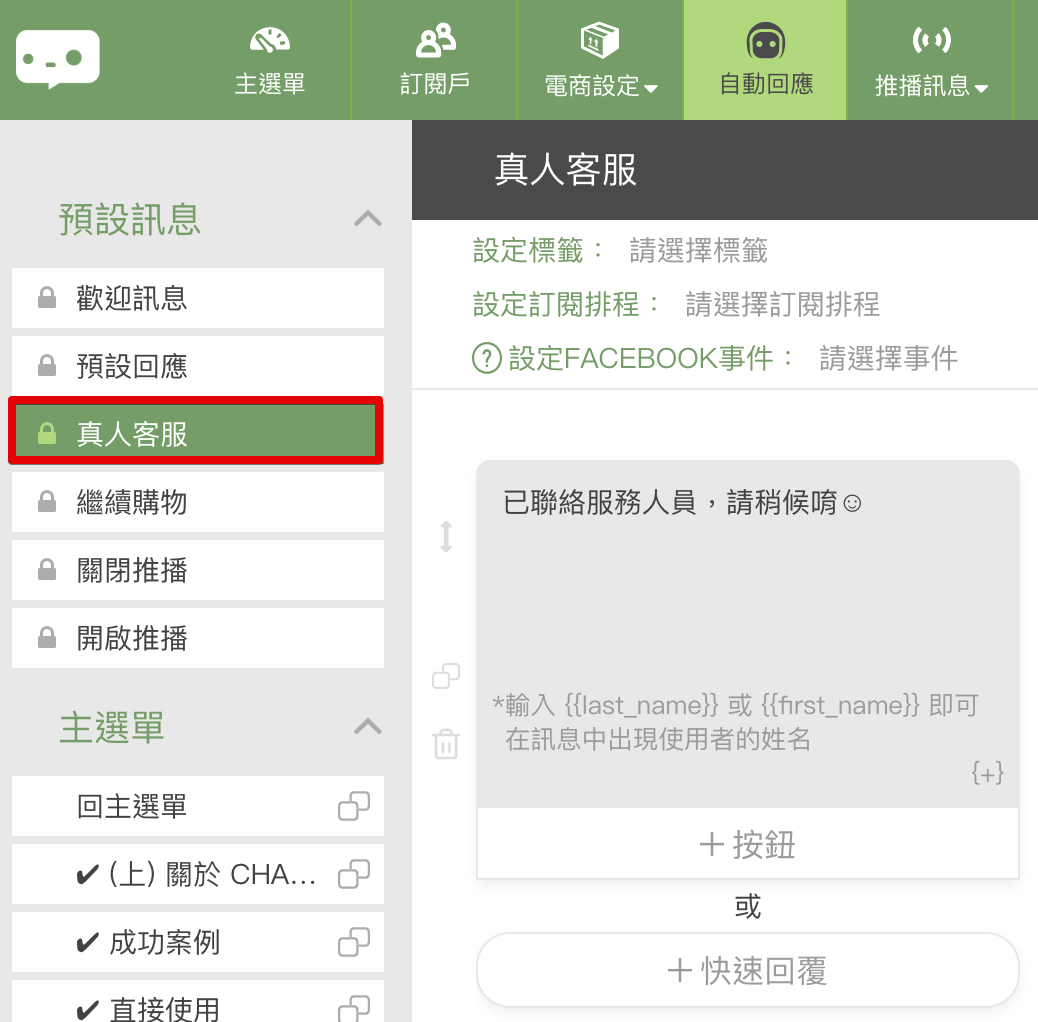
The message users will see when they click on “Customer Service”.

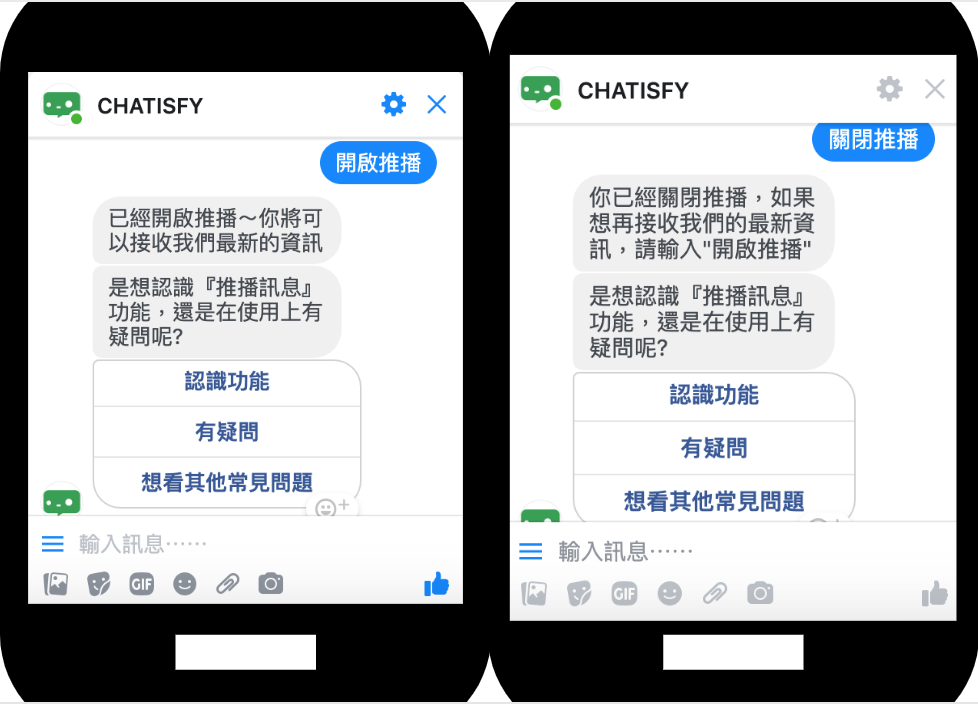
The messages user will get when they enter the keywords such as “Turn on broadcast” and “Turn off broadcast”, and the bot will turn on or off broadcast feature for the user.

Post Reply

Once “Post reply” is successfully set, post comments with the right keywords will trigger “Auto Comment” and “Auto Message”.


Auto Comment is the comment user will see on Facebook post.

Auto Message is the content user will receive in Messenger.

You can use text message telling users to enter certain keyword to trigger auto-reply, or simply use a auto-reply block as auto message.

Keep in mind that whichever way you choose, make sure to guide users to type in or click on a button/quick reply so they become your subscriber.

Auto Comment and Auto Message will only be triggered after setting up ”post reply”. Bot will not reply to existing comments left before you setup post reply.
If a great number of comment is expected, we suggest that you set up post reply beforehand and let bot do the job for you.
Or, you can think about how to attract users who have left a comment previously to do it again!

If you have connected bot to a Facebook page, you can find your latest 70 posts in the drop-down menu.
Scheduled post ID:
Facebook Business Manager > Create & Manage > Page Posts > Scheduled Posts
Ads post ID:
Facebook Business Manager > Create & Manage > Page Posts > Ads Posts
Post with multiple pictures:
Users can also trigger Post Reply when they leave a comment below any picture in the gallery. Use only numeric in the second slash “/” area after ‘photo’ in URL as post ID while setting post reply.
※Note : Post ID of scheduled post and ads post changes when any adjustment takes place. For example, if you make any change to an ads post or its ads setting, the ID changes right away. This will lead to post reply misfunctioned. Please be sure to double check and modify post reply setting when it comes to ads post and scheduled post.

Post reply is one of the most popular feature of CHATISFY, and also the most frequently asked question. Here are some common mistakes in post reply that you can easily avoid, let’s take a look!
1. Forget to hit ”Save” after setting up post reply. Data is not saved, so bot would not start to reply!
2. Use “draft” or “non-public” posts.
3. Use invalid post ID. Post ID of scheduled post and ads post changes when any adjustment takes place. For example, if you make any change to an ads post or its ads setting, the ID changes right away. This will lead to post reply misfunctioned. Please be sure to double check and modify post reply setting when it comes to ads post and scheduled post.
4. Leave comment on behalf of your Page while testing.


Note : We suggest using latest published post for testing to avoid error. Basically, Post Reply works with scheduled posts, too, as soon as the post becomes public.

Exact-match is the most strict condition, only when the comment perfectly matches all of the keywords will the post reply be triggered. The same order is necessary, as well as the exact halfwidth or fullwidth form.

Partial-match is the most often used one. When the comment includes one of the keywords you set up, the bot will automatically reply.

Include is rarely used, it means that the comment needs to include every keywords you set up.


【Example】”I want to travel _____ by train.”

1. If you want users to comment “I want to travel _____ by train”, please select include & setup 2 sets of keywords : ”I want to travel” and “by train”.


2. If you would like to leave some room for creativity, please select partial-match, & you can setup ”I want to”, “travel”, and “by train” as keywords. This way comments that include any of the 3 keywords will trigger the bot to auto-reply, for example : “Travel Japan by train is my dream trip”.


Note : Facebook does not encourage “engagement bait”. It means that there’s a great chance that a post with many identical comments would be identified by Facebook as spammy post, and thus become demoted by Facebook. So setting multiple keywords with partial-match condition is more recommended. The more diverse the content is, the better.

Random reply is highly recommended cause it brings more diversity ( to avoid “engagement bait” ) and also makes it less “robotic.” Here’s how you do it:


1. Set up the first group of reply setting. ( “Partial match” is recommended )
2. Copy the first group.
3. Revise the “Auto Comment” in the second group.


For example, if you put the same keywords “OK” in both first and second group, while the auto comment is “No problem!” in group 1 & “You got it!” in group 2. When a user leaves a comment “OK”, there’s a 50% chance that the bot will reply “No problem!” or “You got it!”.
Of course you can set up more than 2 groups, the chances of each group are equal : 3 groups of content with 33.33% chance, 4 groups of content with 25% chance and so on.

In reply settings, you can find a switch “Only trigger for comments with keywords”, click on it to turn it off (the button will become white). This way, all comments, including images, will trigger post reply.

Click on the camera icon in auto comment section to upload an image. Please note the image is limited to 1Mb or less. 


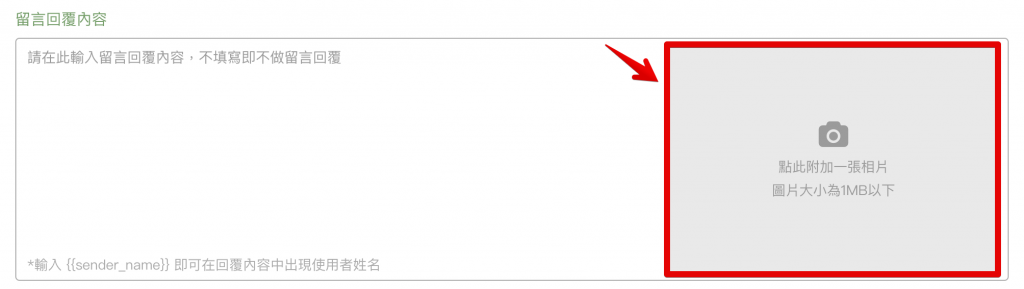
 ※Gif will become static.

Enter a name that helps you identify the post and campaign.

In post reply, you can request users to tag friends in order to increase reach rate. Simply turn on the switch of “Number of people need to be tagging”, and enter the number of friends you want users to tag. Bot will only be triggered when users tag the right number of friends.
Note: Do NOT use EXACT MATCH in this case! If you use friend tagging and exact match at the same time, the bot will NEVER be triggered, because their friends’ names will never match your keyword!

.Auto Comment : The number of times that your bot has been triggered to leave auto comments to users under this post.
.Auto Message : The number of times that user comments triggers auto message under this post.

Get to know instantly if your 「Post Reply」 is working fine!
green ✓ : indicates a healthy and functioning post reply.
red  ! : something went wrong with your post reply! Hit the warning sign to check the error and fix it!

No matter in “auto comment” or “auto message”, inserting URL is a taboo.
Although Facebook has not listed it black-and-white, but there is a great chance to lose reach rate or even get banned from posting and commenting if you insert a URL into post reply.


Here’s the right way to do it:
1. First, create an auto-reply block, put the URL in a button.
2. If you choose “text format” for auto message, use “keywords” to trigger the auto-reply block you just set up.
3. If you choose “block format” for auto message, simply select the auto-reply block you just set up.
4. Do not insert URL in auto comment under any circumstances!

E-Commerce

This feature enables you to build up product inventory quickly, definitely recommended for Bot beginners!
First, download the Excel template from dashboard, fill out product information accordingly and upload. Your products should be shown in the product list by then. After building your product inventory, users will be able to browse products and checkout in Messenger.


※Note : One-click setup will RESET all products, auto-reply and keywords settings. If you have set up auto-reply and keywords, please do not use one-click setup!


※Quick Tip : If you are running an e-commerce website or a Facebook store, you can set up Facebook Product Feed in Bot Settings. Once set up correctly, you can find「Product Feed」in auto-reply card, and you can insert products from your website into bot conversations.

・Product name : Limited to 135 words
・Product description : Limited to 4000 words
・Product image : Up to 5 images for each product, maximum 1MB each (Image framed at 750×750 pixels)
※Note : Do not forget to hit「Save」after editing!

Payment methods you can choose from : ATM transfer, cash on delivery, EcPay, PayPal, TapPay and Line Pay.

※Note : For EcPay, PayPal, TapPay and Line Pay, you have to sign up on those payment systems beforehand, and then fill in required data on CHATISFY dashboard to complete connection.

TapPay supports following banks in Taiwan : Cathay Bank, E.SUN Bank, TaiShin Bank, CTBC Bank, SinoPac Bank, KGI Bank, TCB Bank, First Bank, NCCC, NewebPay, Fubon Bank, Sunny Bank, Bank of China, UBOT Bank and MOLPay. (2019.10)

Recommended to Merchants who have limited product skus and able to build up latest arrivals to product inventory periodically by themselves. Moreover, those who allow users to checkout in Messenger or Line and eventually ship products by themselves.
Shipping options provided: Delivery in person, Mail delivery, Home delivery, Pick up at Family Mart / 7-11 / Hi-Life. You can set up different shipping fee for different shipping options.


If a user chooses ‘pick up and pay at convenience store’, you will receive a form to fill out while shipping products. The convenience store will transfer payment to your bank account after receiving it.

You can assign products through distribution management if you invite some internet celebrities or friends to promote your products. This feature generates exclusive link for each spokesman, making it easy for you to track the statistics, including click, purchase and selling amount of each seller. Simple yet efficient!


※Note: Distribution management is not available for Free Plan. (All features are available during Free Trial)